INSTALLATION
GUIDELINES
Hydrotite is conveniently packaged in boxes of 6 x 10m rolls and is compatible with most surface conditions.

Our product specialists have over 20 years of hands-on experience working with Hydrotite waterstop products. For installation guidelines for your specific application, please Contact Us.
 Attach Hydrotite to smooth and even surfaces, free of dirt, oil or laitance for best results. Maintain a minimum of 50 mm concrete coverage over Hydrotite when using 25mPa or greater compressive strength concrete. Increase the coverage to 100 mm on reduced strength concrete. Hydrotite profiles may be installed in a formed groove of appropriate dimensions or directly on a flat concrete surface.
Hydrotite profiles are installed after the form is stripped from the first pour and before the second concrete pour is made. Therefore, splitting the form is not required. Due to the hydrophilic nature of the Hydrotite product, installation of the profile should be timed as close as possible to the second placement of concrete. This will reduce the chance for premature expansion of Hydrotite due to rain water or groundwater exposure.
Hydrotite CJ profiles are commonly used in conjunction with typical PVC waterstops and should be cut to butt up directly to the PVC. Place several drops of a cyanacrylate type adhesive (super-glue) to the PVC and the cut end of Hydrotite, and immediately join the ends together. Hold in position for approximately 30 seconds to allow the adhesive to set. Apply a sufficient bead of Leakmaster adhesive to the Hydrotite / PVC junction.
Smooth Concrete Surface – Normal forming practice leaves a sufficiently smooth surface for direct bonding of Hydrotite using Leakmaster as an adhesive. Leakmaster works well when applied to dry or damp concrete surfaces. First, remove all dust, oil, laitance, etc. from concrete surface prior to installing Hydrotite. Apply a sufficient bead of Leakmaster to the concrete, and place the Hydrotite profile into position. Concrete nails may be used to hold the profile in position on vertical or overhead surfaces while the Leakmaster cures.
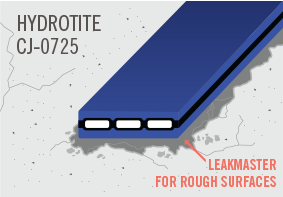
Rough Concrete Surface – Concrete surfaces left rough due to instances such as jackhammering, extensive weathering should be brought to a smooth level condition. Leakmaster can be used for this purpose when the concrete surface is dry. Apply a sufficient bead of Leakmaster to the rough concrete to ensure a smooth level surface. The Hydrotite profile should be placed in position within 4 hours. Concrete nails or special fasteners may be used on to hold the profile in position and on vertical or overhead surfaces to hold the profile in position while the Leakmaster cures.
Extremely Rough Surface – Two-part epoxy may also be used to level extremely erratic surfaces. Epoxy can be used on rough, damp concrete surfaces to bond Hydrotite into position. The Hydrotite profile should be applied to the bed of epoxy prior to final cure, which takes approximately 30 minutes. Concrete nails may be used on vertical or overhead applications.
In all three installation methods, installed Hydrotite profiles should be inspected to ensure that no separation exists between the Hydrotite profile and the substrate. If this is observed, apply a suitable bead of Leakmaster in the separation and secure with nails or special fasteners as required.
Hydrotite CJ profiles are designed with a cellular cross-section, which allows the profile to compress slightly when concrete is placed and rebound as the concrete shrinks during curing. The cellular cross-section also acts to control the expansive force placed on the surrounding concrete.
Splicing Instructions – Straight lengths of Hydrotite should be cut square with a sharp knife or reliable pair of shears. Place several drops of a cyanoacrylate type adhesive (super-glue) on the cut ends of Hydrotite and immediately join the ends together. Hold it in position for approximately 30 seconds to allow the adhesive to set. Proper alignment and bonding of the cut ends will prevent water entering the cells of the profile. Future hydration of the waterstop will further seal the bond area.
Splicing Options – Flat 90 °corners should be spliced by miter cutting the two ends at 45° and then proceed with instructions above. Flat “Ts” and “Xs” should be made by butt slicing and joining the legs with the use of super-glue. Vertical 90° corner, vertical “Ts” and vertical “Xs” should be butted and bonded with the super-glue. Prefabricated and spliced components are available.

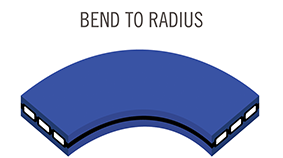
Bend to Radius – CJ-0725 can be bent to a minimum radius of approx. 50 mm. Otherwise miter and bond with super-glue.
Note – All splices must be further enhanced by placing a bead of Leakmaster at the splice.
Cracking of the concrete, caused by the expansion pressure of Hydrotite, can be avoided by maintaining a 50 mm minimum concrete coverage. Increase this coverage if lightweight or low strength concrete (<25 mPa compressive strength) is used. Appropriate concrete placement techniques must be implemented to ensure proper concrete consolidation.
Hydrotite should be stored in a cool, dark and dry place. Exposure to moisture prior to installation may expand Hydrotite prematurely. If Hydrotite is installed in an expanded condition, the effectiveness of the seal may be severely reduced.
Once installed, adequate measures should be taken to prevent exposure to elements such as rainwater, ground water before the joint is covered with concrete.